If you've ever admired the perfectly uniform slices in a restaurant salad or wondered how to achieve those delicate, paper-thin potato chips at home, the secret weapon is often a mandoline slicer. This versatile kitchen tool is a game-changer for home cooks, turning tedious chopping into a swift, precise, and almost effortless task. However, its reputation for being intimidating or even dangerous often overshadows its incredible utility. This comprehensive guide is designed to demystify the mandoline, focusing on safe operation, unlocking its full potential, and helping you slice with confidence and creativity.
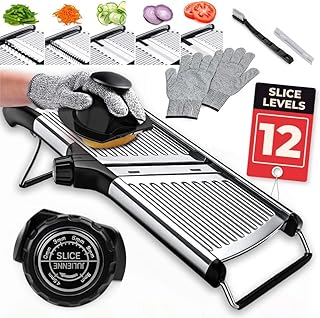
At its core, a mandoline slicer is a manual food slicer that uses a sharp, stationary blade and an adjustable platform to create consistent cuts. Unlike a knife, which relies on the user's skill for uniformity, a mandoline guarantees perfect results every time. Modern designs, like the popular 6-in-1 models, have evolved significantly. They now come equipped with multiple interchangeable blades for slicing, julienning, shredding, and even creating fun waffle cuts, all housed in a user-friendly frame designed with safety as a priority.
Understanding Your Mandoline Slicer: Parts and Functions
Before you make your first cut, it's crucial to understand the components of your slicer. A typical multi-functional model, such as the Ourokhome 6-in-1 Mandolin Slicer, consists of several key parts. The main body houses the blade carriage. The food holder, or pusher, is your primary safety tool—it keeps your fingers well away from the sharp blades. The adjustable thickness dial allows you to select your desired slice, from super-thin for chips to thicker for steak fries. Finally, the set of interchangeable blades is where the magic happens. Let's break down what each blade typically does:
- Straight Slicing Blade: The workhorse. Creates flat, even slices ideal for potatoes, cucumbers, onions, and tomatoes.
- Waffle/Grid Blade: Creates a beautiful lattice or criss-cross pattern, perfect for making sweet potato waffle fries or decorative zucchini slices.
- Julienne/Shredding Blades: These turn vegetables into matchsticks or fine shreds, essential for coleslaw, stir-fries, or carrot salads. A high-quality vegetable shredder function is a cornerstone of efficient meal prep.
- Ripple/Wavy Blade: Adds a decorative, ruffled edge to slices, great for potato gratin or adding visual interest to a crudité platter.
The Non-Negotiable: Mandoline Slicer Safety First
The number one rule of mandoline use is safety. The blades are exceptionally sharp to ensure clean cuts, which means they can cause serious injury if used carelessly. Following these safety protocols will make your experience not only safe but also enjoyable.
- Always Use the Food Holder/Pusher: This is your finger's guardian. Never, under any circumstances, attempt to slice the last piece of a vegetable with your bare hands. It's better to waste a small bit of food than risk a trip to the emergency room. A safe mandoline experience is entirely dependent on this simple tool.
- Engage the Safety Lock: When changing blades or storing the mandoline, ensure the safety lock is engaged to prevent accidental contact with the blades.
- Work on a Stable Surface: Place the mandoline on a damp cloth or a non-slip mat to prevent it from sliding during use.
- Pay Full Attention: Don't get distracted. Focus on the motion of pushing the food through in a smooth, controlled manner.
- Store Safely: Always use the blade guard or a dedicated storage case. Never leave loose blades in a drawer.
Step-by-Step Guide to Using Your 6-in-1 Mandoline
Let's walk through the process of using a versatile model like the Ourokhome slicer from start to finish.
Step 1: Assembly and Blade Selection. Place the mandoline on your stable work surface. Choose the blade for your desired cut (e.g., the straight blade for slices, the shredder blade for coleslaw). Insert it securely into the carriage until it clicks into place. Set your thickness dial—start with a medium setting if you're unsure.
Step 2: Preparing Your Produce. Wash and dry your vegetables. For stability and safety, it's best to create a flat surface. Cut a small slice off the bottom of a round vegetable like an onion or potato so it sits firmly on the mandoline platform.
Step 3: The Slicing Motion. Place the flat side of the vegetable against the food platform. Fit the food holder securely over the top of the vegetable. Applying firm, even pressure, push the holder down and forward in one smooth motion. Let the blade do the work; don't force it.
Step 4: Blade Changes and Cleaning. Once finished, disengage the safety lock. Carefully remove the blade by the designated safe handles (never by the sharp edges). Most components, including the blades and the body of the Ourokhome mandoline, are dishwasher safe for easy cleanup, but always check your specific model's instructions. Dry blades immediately to prevent rusting.
Creative Applications: Beyond Basic Slicing
A multi-blade mandoline opens up a world of culinary possibilities. It's more than just a vegetable chopper; it's a textural artist.
- Homemade Potato & Vegetable Chips: Use the thinnest setting on the straight blade. Soak potato slices in cold water to remove starch, pat dry, and fry or bake for perfectly crisp, uniform chips.
- Restaurant-Style Salads: Achieve paper-thin radish, fennel, or cucumber slices that elevate a simple green salad.
- Effortless Gratin and Lasagna: Get uniformly thin potato or zucchini slices for even cooking in baked dishes.
- Fun Waffle Fries: The waffle cutter blade isn't just for looks. The increased surface area on sweet potato or regular potato waffle fries makes them extra crispy when baked or air-fried.
- Quick-Pickled Vegetables: Use the julienne blade to shred carrots, daikon, or cucumbers for fast, crunchy pickles that are ready in hours.
Choosing the Right Mandoline Slicer for Your Kitchen
With many options on the market, selecting the right one is key. For most home cooks, a multi-functional model like a 6-in-1 offers the best value and versatility. Look for features that enhance safety, such as a sturdy, ergonomic food holder and non-slip feet. Consider the materials—stainless steel blades for durability and a body that's easy to clean. Storage is also important; a model that comes with a case or blade guards keeps everything organized and safe. Investing in a well-designed kitchen mandoline from a reputable brand is an investment in years of easier, faster, and more enjoyable cooking.
Common Mistakes to Avoid
Even with the best intentions, simple errors can lead to subpar results or safety issues.
- Using Dull or Damaged Blades: A dull blade requires more force, increasing the risk of slipping. Replace blades if they become nicked or no longer cut cleanly.
- Ignoring the Thickness Setting: Trying to slice too thickly on a thin setting can jam the blade. Adjust the dial according to the density of the food.
- Rushing the Process: Speed leads to mistakes. Focus on control and consistency over speed.
- Improper Cleaning: Not cleaning the mandoline thoroughly after use, especially after starchy foods like potatoes, can lead to residue buildup and corrosion on the blades.
Mastering the mandoline slicer is one of the most rewarding skills a home cook can acquire. It bridges the gap between home kitchen and professional results, saving immense time on meal prep while unlocking new textures and presentations. By respecting its power, adhering to strict safety practices, and exploring its various functions—from a simple slicer to a creative kitchen gadget for waffle cuts—you transform it from a feared tool into an indispensable ally. Start with firm vegetables like carrots or potatoes, follow the guidelines in this guide, and soon you'll be slicing with the confidence and precision of a seasoned chef.